Drop Ceiling Calculator
To estimate a drop ceiling, count panel rows in each direction, rounding up so cut border panels are included, and multiply: a 13 ft 4 in × 10 ft 8 in room needs 7 × 6 = 42 panels in a 2 × 2 ft grid. For the grid itself, plan main tees 4 ft apart with a hanger wire every 4 ft, 4 ft cross tees every 2 ft, 2 ft cross tees for a 2 × 2 layout, and wall angle around the perimeter.
This ceiling grid calculator counts every part, sizes the border panels for a centered layout, and can total the cost.
How to use the Drop Ceiling Calculator
- Choose Feet & inches or Meters, then enter the Room length and Room width, measured wall to wall at ceiling height. Split an L-shaped room into rectangles and run each one.
- Pick the Panel size: 2 × 2 ft or 2 × 4 ft.
- Choose whether the Main tees run along the room's length or width. Main tees usually run perpendicular to the ceiling joists, so this depends on your framing.
- Check the Main tee length (12 ft is standard) and Wall angle length (10 ft or 12 ft) against the products you plan to buy.
- Set Spare panels for breakage and future repairs. Cut border panels are already counted.
- Tick Add prices if you want a cost estimate, then press Calculate.
Drop ceiling formulas
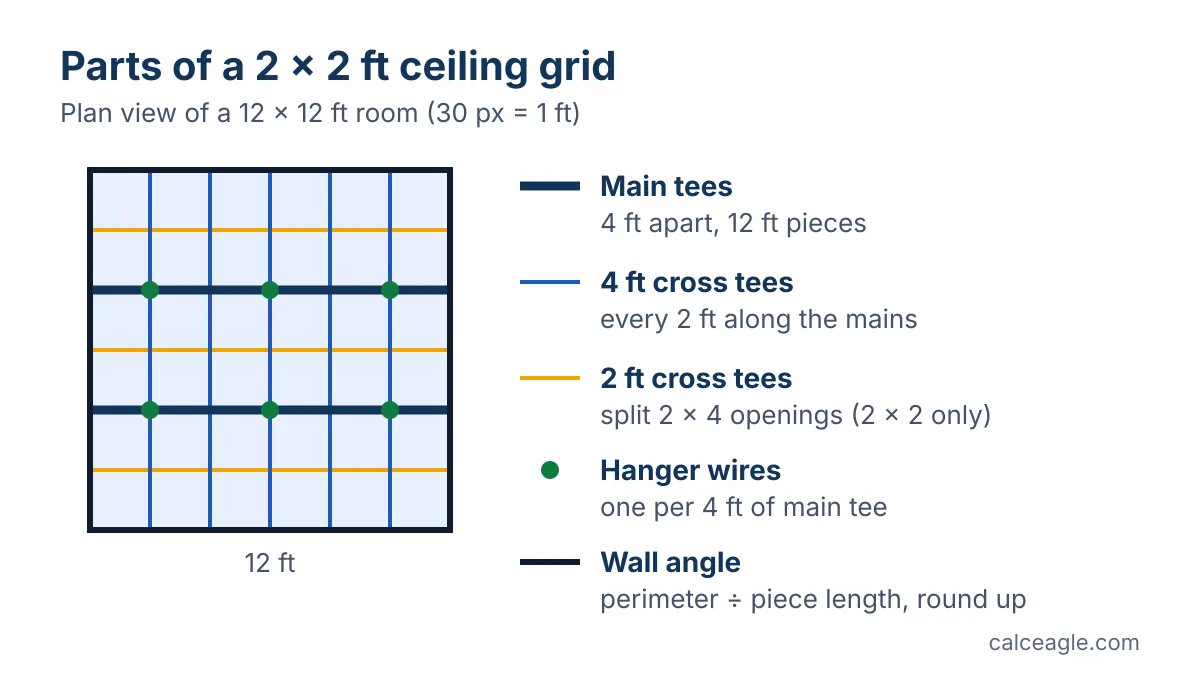
A suspended ceiling grid has main tees 4 ft apart, 4 ft cross tees between them every 2 ft, and, for a 2 × 2 layout, 2 ft cross tees that split each 2 × 4 opening in half. Wall angle runs around the perimeter, and hanger wires hold up the main tees every 4 ft.
"Run length" is the room dimension the main tees run along. Main tee rows are the grid lines 4 ft apart across the other dimension.
Example: 13 ft 4 in × 10 ft 8 in basement room
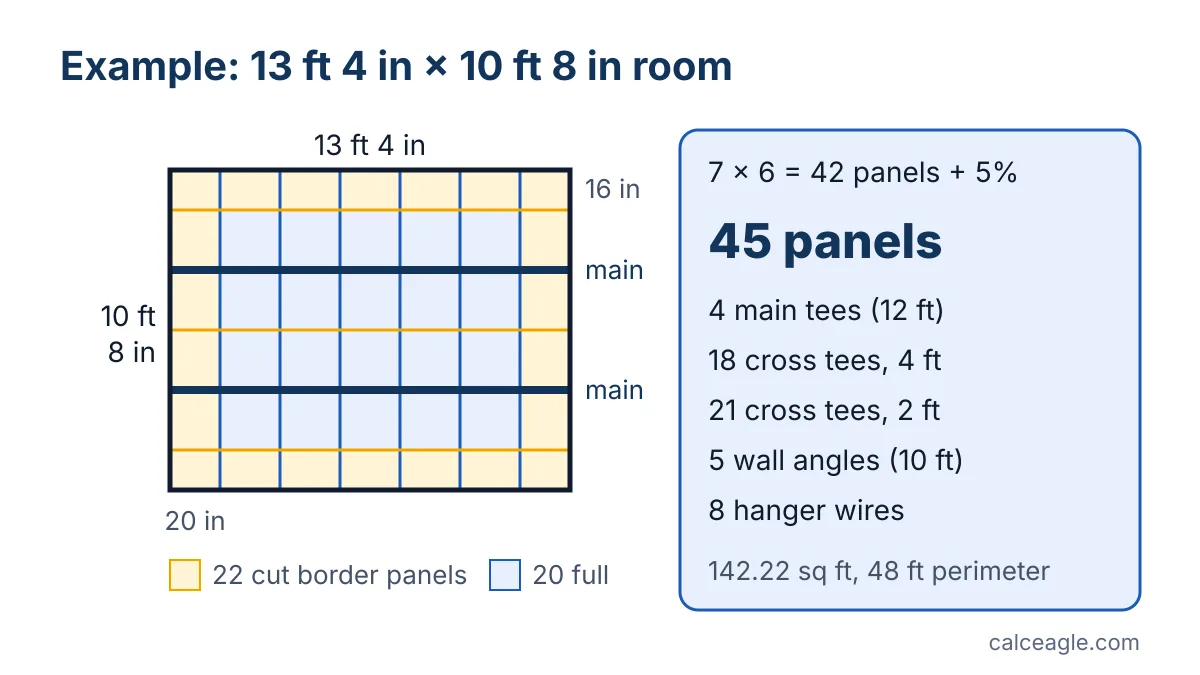
A basement rec room measures 13 ft 4 in by 10 ft 8 in. The owner wants 2 × 2 ft panels with the main tees running along the 13 ft 4 in length, 12 ft main tees, 10 ft wall angle and 5% spare panels.
- Area: 13.33 × 10.67 = 142.22 sq ft. Perimeter: 2 × (13 ft 4 in + 10 ft 8 in) = 48 ft.
- Across the width: 10 ft 8 in holds 5 full 2 ft panels with 8 in left over. (8 + 24) ÷ 2 = 16 in borders, giving 4 full rows plus 2 border rows: 6 rows.
- Along the length: 13 ft 4 in holds 6 full panels with 16 in left over. (16 + 24) ÷ 2 = 20 in borders, giving 5 full rows plus 2 border rows: 7 rows.
- Panels: 7 × 6 = 42 (20 full and 22 cut). With 5% spare, 44.1 rounds up to 45 panels.
- Main tees: grid lines across the width fall at 1 ft 4 in, 3 ft 4 in, 5 ft 4 in, 7 ft 4 in and 9 ft 4 in from the wall. Mains go on the 3 ft 4 in and 7 ft 4 in lines, 4 ft apart, so 2 rows × 2 pieces (13.33 ÷ 12 = 1.11, rounded up) = 4 main tees.
- 4 ft cross tees: 6 rows × 3 spans (wall to main, main to main, main to wall) = 18.
- 2 ft cross tees: 3 lines × 7 segments = 21.
- Wall angle: 48 ÷ 10 = 4.8, so 5 pieces of 10 ft (or exactly 4 pieces of 12 ft).
- Hanger wires: 2 rows × 4 wires (13.33 ÷ 4 = 3.33, rounded up) = 8 wires.
Planning the layout
Armstrong and USG both recommend a centered grid, so the cut border panels on opposite walls are the same size. Divide the room dimension by the panel size, add one full panel to the remainder, and split the result in half. Armstrong's own example is a 10 ft 8 in room with 2 ft panels: 8 in left over becomes two 16 in borders instead of one 8 in strip. USG's guide says to adjust the layout if borders come out smaller than half a panel; with this method they are always between half and a full panel, unless the room is narrower than one panel.
For 2 × 4 ft panels, the long side of each panel spans the 4 ft between main tees, so borders across the mains are figured on 4 ft and borders along the mains on 2 ft. Armstrong's 2 × 4 example: a 9 ft room leaves 1 ft over, so (1 + 4) ÷ 2 = 2 ft 6 in borders.
How to read the result
- Panels to buy includes every cut border panel plus your spare percentage. If your panels come in cartons, round up to full cartons.
- Main tees, cross tees and wall angle are whole pieces. Main tees are counted per row, rounded up, because a row longer than 12 ft needs a spliced second piece.
- Hanger wires follow the one-wire-every-4-ft spacing in the USG and Armstrong guides. Buy a screw eye or other fastener for each wire.
- Layout gives the border sizes and where the first main tee goes, measured from the side wall.
Assumptions and limitations
- Main tees are 4 ft on center with a hanger wire every 4 ft, and cross tees are on a 2 ft module, as in the USG and Armstrong installation guides. Commercial projects can have stricter requirements; USG, for example, calls for 12 ga hanger wire on commercial jobs instead of 18 ga.
- Each cut border piece uses its own cross tee. If you can cut two short border pieces from one 4 ft tee, you will need fewer, so the count leans slightly high.
- Main tee offcuts are not reused from row to row, and wall angle is counted from the total perimeter, assuming pieces can be butted together along a wall.
- The grid uses U.S. 2 × 2 ft and 2 × 4 ft modules. Metric mode converts the room size only.
- Light fixtures, vents and soffits are not included. Armstrong calls for an extra hanger wire at each corner of a light fixture.
- Results are estimates. Follow the installation instructions for the grid you buy and your local building code.
Common mistakes
- Starting the grid against one wall. You end up with a full panel on one side and a thin sliver on the other. Center the layout instead.
- Running main tees the wrong way. Armstrong's instructions run main beams perpendicular to the ceiling joists; check your framing before you snap the lines.
- Forgetting clearance. Armstrong lists a minimum 3 in drop below the joists, ducts or pipes when using hanger wire, plus extra height for drop-in lights.
- Ordering only full panels. A room that is not an exact multiple of 2 ft needs cut panels on every edge, and each one uses a whole panel.
Finishing the walls or floor too? Try the Brick Calculator for brick and mortar, or the Grout Calculator for tile grout. The Percentage Calculator helps with sales tax or a contractor markup.
Frequently asked questions
How do I calculate border tiles for a drop ceiling?
Divide the room dimension by the panel size and keep the remainder. Add one full panel to the remainder and divide by 2. For a 10 ft 8 in room with 2 ft panels, the remainder is 8 in, so the borders are (8 + 24) ÷ 2 = 16 in on each side.
How far apart are main tees and hanger wires?
Main tees are typically installed 4 ft on center, with a hanger wire every 4 ft along each main tee, according to the USG and Armstrong installation guides. Add wires at light fixtures.
How many ceiling tiles do I need for a 12 × 12 ft room?
A 12 × 12 ft room is an exact multiple of 2 ft, so no panels are cut: 36 panels for a 2 × 2 grid (6 × 6) or 18 panels for a 2 × 4 grid (6 × 3). Add a few spares for breakage.
What lengths do drop ceiling grid parts come in?
USG's retail guide lists 12 ft main tees, 4 ft and 2 ft cross tees, and wall angle in 10 ft lengths (sometimes 12 ft). Armstrong notes main beams also come in 6 ft lengths. Check the products at your store.
How much space do I need above a drop ceiling?
Armstrong lists a minimum drop of 3 in below joists, pipes or ducts when hanging the grid on wire, and suggests adding 2 in to the height of a drop-in light fixture for clearance.
Sources and references
- Retail Installation and Maintenance Instruction Guide (WL1491) — USG Corporation
- Installing Suspended Ceilings: Assembly and Installation Instructions — Armstrong World Industries
- How To Install Your Armstrong Suspended Ceiling Panels — Armstrong World Industries
- How to Install Drop Ceilings — Kanopi by Armstrong
Formulas and content last reviewed on October 13, 2026. Last updated October 13, 2026. Results are estimates for general information only. Spotted a problem? Tell us and we will check it.